Bleed Options
Full bleed printing means that your design prints to the edge of the paper. When setting up a file for full bleed printing, the background design needs to extend 0.125" beyond the cut line on all sides. As a result, the file size should measure 0.25" larger than the print size.
For example, a 4" x 6" full bleed print should be set up with a file size of 4.25" x 6.25". Please ensure that all critical text and graphics are a full 0.25" from all edges to avoid being trimmed during the cutting process.
Below is an example of how to properly setup your file for full bleed printing using a CatPrint design template.
There are three elements to know when setting up your Full-Bleed files:
Bleed : Artwork that goes to the edge of your design needs to be extended 1/8" through the bleed area.
Cut Line : The thick, dotted line indicates where your design will be cut at the desired size.
Safety Line : Keep artwork and text within this line to ensure it will not be cut off.
Example
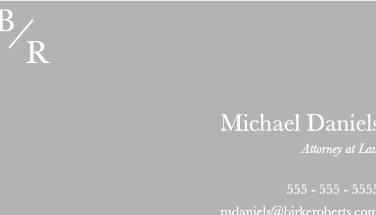
Here is an image of a 3.5" x 2" full bleed template, with an image imposed in the template:
This example shows how to use the bleed, cut line, and safety line to properly set up your file. As you can see, the design or image must extend through the bleed area. The safety line marks 0.25" from the edge of the file size. Your critical text and graphics should not extend beyond this line.

With this proper setup, the printed piece will appear as shown:

This example shows the incorrect way to use the template. As you can see, the text and logo extend beyond the safety line and cut line.

This improper setup would result in a printed piece as shown.
Setting up your full bleed files is easy, but can be tricky the first time. If you have any questions about setting up your files and designs, please be sure to reach out to our friendly customer service representatives at support@catprint.com or review our blog post.